Many of you will know that I’m a fan of Tarptent tents. Henry Shires has been probably the most innovative tent designer and manufacturer over the last 20 years. If I could only have one tent, it would be the Scarp 1. Of course I didn’t stop at that, so I have the Notch Li too, which is the best double wall light tent IMO. If the Moment DW had been in a stealthier colour, I would’ve bought that instead of the F10 Helium. Of all his innovations, the pitchloc corner has been a game changer. It’s made the Scarp, Notch and Stratospire phenomenally strong tents.
Unusually, Henry has remained accessible to ordinary backpackers, often answering enquiries personally. He’s answered emails from me as well as some of my friends and even commented on this blog. In this interview there’s some interesting insights into materials as well as his design process. It looks like he may go back to using more silnylon for floors. Ultra TNT looks like an interesting material. Personally, I’d prefer it in a more muted colour, but that doesn’t look feasible. For the moment I’m sticking with my silnylon Scarp. Anyway, worth watching.
After seeing a few reviews on YouTube of the Light Tour sleeping mat (not cushion!), I decided to buy one. I wanted the larger rectangular mat as it’s wider than the mummy shape. As a side sleeper I thought it would be better to have a slightly wider mat. The cost was £114 + £4 shipping and it took eight days to arrive (tracking is provided) from China, which is pretty good over New Year. Final delivery was by Royal Mail.
For the price, it seems to be good. I won’t give it a proper test for a while. It’s slightly heavier than spec at 610g. It’s also a bit shorter than advertised at 175cm fully inflated. Width is 63cm. The length is not an issue for me as is just long enough. There is a longer length available. Inflation is easy and deflation quick, with a valve that is compatible with the Exped pump sack and Flextail pump. A decent pumpsack/ dry bag is provided.
Fully inflated it seems comfortable to lie on. In terms of warmth it feels warm, although I don’t think it’s as warm as my Nemo Tensor Alpine, which has an R value of 4.8 compared with the claimed 5.8 for the Light Tour. It’s about the same thickness but if you press it, you are more likely to feel the ground than the Tensor. When lying down fully, this isn’t an issue. I usually put a section of thin foam under my mats anyway. It’s also a bit noisier but not like a Thermarest.
Overall, for the price, it seems a good pad. Nemo does a Tensor Alpine the same size as the Light Tour but it’s double the price. If you’re looking for a winter mat, I suspect that’s a better mat. However, the Light Tour seems a good option outside of winter.
I spotted these on Amazon recently. Strangely they aren’t on the Salomon website but you can get them elsewhere, like on the John Lewis site, so they should be legit. They are currently on Amazon at £114 compared with a RRP of £155.
They are are revival of the version 2 X Ultra Mid boots. I’ve had versions 1,2 and 3 of the X Ultras and the version 2 is the best iteration IMO. The version 1 didn’t fit as well and was bit sweaty and the version 3 had a slightly different lacing system which wasn’t quite as comfortable.
I used a pair of the version 2’s on my 2017 TGO Challenge and was pleasantly surprised at how well they performed. Not only were they very comfortable but they kept my feet dry and minimally sweaty. I covered the toe area in a thin coating of Silnet which kept the water out and stopped the material from wetting out.
I think this is a major reason why fabric boots tend to fail. Either they get waterlogged and stop breathing and your feet get sweaty or the water gets trapped between the fabric and the membrane and eventually the water works its way through.
My only gripe with the X Ultras is that I’d prefer a more hard wearing and grippy sole. I wish it was Vibram. The Pioneer has low grade insoles so I’m replacing those. I’m testing the Pioneers with Superfeet, Sidas and Stsvzorr insoles (the latter from Amazon too) to see what works best.
I bought two of pairs of Pioneers so they should last me for a few years. Salomon do a version 4 of the X Ultra Mids but I was put off buying a pair as they have a weird Achilles tendon flap. Anyway, hopefully the Pioneers will keep me going for the foreseeable future.
I’ve used the Helium UL 1 on three stealth camps in the forest now and thought I’d do a post on the mods.
Groundsheet protector
Because I’ve been in the forest, I’ve used a groundsheet protector. There’s a lot of leaf litter, so it’s impossible to clear all the twigs etc therefore it seemed wise to use one. Having said that, in most circumstances it would be superfluous as the groundsheet seems pretty robust. I’ve been using the Gram Counter Small protector which fits most of the tent groundsheet. It doesn’t cover the porch nor a small part opposite the door, but it does cover all the area that you lie on. I’ve put some shock cord and ordinary cord on the corners so it fits the tent corner tie outs exactly. Another advantage of the protector is being able to lay it out first so you can see the area you will be lying on. It weighs 111g vs 172g for the F10 one, so a decent weight saving.
End guys
On the end guys, I’ve added a sail ring and a loop of cord. The sail ring enables the original guy to run freely when adjusting. The additional loop means I can use a bigger peg if I want to. Not an essential mod but it makes set up a bit easier.
Pole tension adjuster
There’s a buckle to adjust the pole tension but the loop of webbing is very small so I’ve added a loop of cord to make it easier to adjust. Again, not essential but helps setup.
Side guys
While the original side guys were fine, they were a bit short and grey. Being grey, they were difficult to see and easy to trip over, so I changed them to thinner, longer yellow guys. The cord is also non-stretch do the pitch is tauter too.
Fly door clip
I really don’t like the way the fly door folds away. There’s a toggle on the door which clips onto a hoop on the outer side of roof of the inner. It’s fiddly and the fly can flap and come loose. An easy fix is to use a plastic clothes peg. It’s much easier to use and is more secure.
Inner door clip
The inner door has a toggle and loop to tie back which is fine. However, you have to have the whole door open. I’ve decided to use another clothes peg instead. It’s a lot easier and quicker.
Tension band
The Helium has the F10 Tension Band System which stabilises the pole arch from inside. I found the supplied cord didn’t run easily through the tensioner so I replaced it with slightly thinner cord. It works better now. It is detachable so I would only use it when necessary. However the band at the rear doesn’t get in the way, so I left it in place. It can double as a washing line.
Tent pocket
The only pockets are two small ones in the roof of the inner. They are fine for small items like a torch but I wanted one at the end so I got a friend to make one. I attached it with safety pins so I can move it to the opposite end if needed. It’s great for an iPhone or tissues. I’m not sure why F10 didn’t put pockets at the ends as standard as try weigh next to nothing.
I mentioned in a previous post that the porch is quite narrow, especially for cooking. You can detach the groundsheet from the cord that connects the pole ends and pull it back to widen the porch. However there’s no way to secure it, so I sewed an elastic loop to marry up with the toggle that secures the front of the groundsheet to the pole webbing, shown in the pictures below.
I noticed that the top of the groundsheet was a bit high as it was under extra tension. The solution was to use a kamsnap to fasten it down. Perfect! It adds an extra 15cm width to make it 40cms, not huge but enough for cooking.
In the main, the Helium is a good tent and I’m very happy with it, especially for the price. For me, these mods make it even better. This post is a bit long, so I’ll do another with some further thoughts and suggestions for changes. Who knows Vango might even choose to use some.
Hmmm. I’ve bought a new tent. I do have a bit of a collection! Why did I buy this? Well, I’ve been thinking about doing some of the shorter trails in East Anglia as an alternative to driving North to the Peak District, Lake District or North Wales. They don’t have the hills that I love, but they are a lot closer and flatter, which will be less strenuous. The biggest issue for me is the challenge of wild camping. That’s why I thought of getting a different tent.
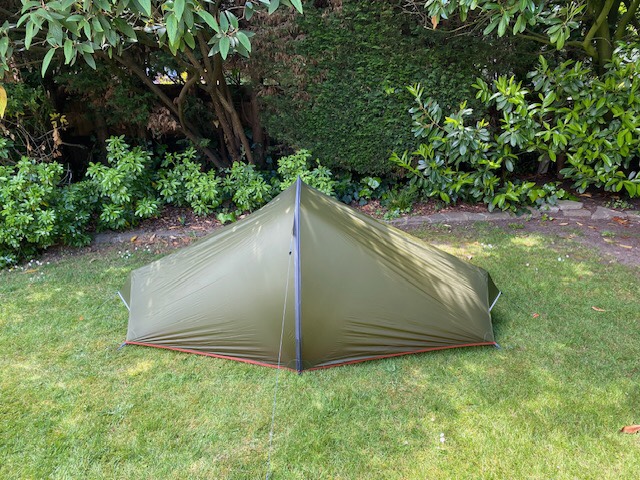
None of my tents are particularly stealth, except for the Helm 1, which is a bit heavy. I wanted something that didn’t weigh more than about a kilo and didn’t use trekking poles as they are a bit superfluous on lowland trails. I wanted a double skin tent that was fly sheet first pitch with a small footprint. The other feature that is important for lowland camping is a fly sheet colour that wouldn’t draw attention, green or brown.
Tents I narrowed it down to were the Terra Nova Laser Compact 1 and Starlite 1 and the F10 Helium UL 1. The Starlite looked good but I rejected because of lack of headroom as it is too low to sit up comfortably. The Laser Compact and Helium are very similar but there are some important differences.
The Helium is a lot cheaper, at less than half the price of the Laser Compact. The Laser is slightly lighter, saving 141g, taking the tent and poles together (892g vs 1,033g) . The poles in the Helium account for most of this difference (102g). The supplied pegs are a bit heavier too, but I will swap some of them. The colours are slightly different with the Laser being a darker green. Helium is a darker, more khaki green than the publicity photos and should blend in well. Obviously camo would be best but that isn’t really an option in mainstream tents!
Looking at the dimension diagrams, the dimensions of the two tents are virtually identical. The Helium inner is marginally shorter and the porch slightly smaller. However, the headroom is better because of the pre-bent poles which means the apex of the arch is virtually flat. The F10 also has tension band system (TBS) which should add stability. To be honest, the TBS is quite intrusive and fiddly on the Helium and I’d rather have double guys each side on the pole arch like Hilleberg tents. Another difference is the groundsheet on the Helium which is 70D compared with 30D on the Laser, although the hydrostatic head is slightly lower.
I haven’t seen a Laser Compact in the flesh, but I did own a Laser Competition. Comparing the Helium with the Laser Competition, the inner feels roomier, I suspect the ends are marginally wider. The porch is a lot smaller, but you can detach the inner at the centre of the door and pull it back to make more space. Extra care will be needed if cooking in the porch.
I don’t like the door tie back system. There’s a toggle on the fly sheet hem which connects to a ring on the roof of the inner. Not only is it fiddly but it seems to come loose easily. I tried some clothes pegs, but those can slip too. I’ve ordered some magnetic tie backs which hopefully will solve this issue ( https://speedsterstoves.co.uk/other-products/speedster-stoves-silicone-magnets.html ). It’s a real issue if you are cooking in the porch, as the door coming loose could flap against the stove a catch fire. A poor design IMO.
There are two small mesh pockets inside the roof of the inner. Personally I’d rather there were a larger mesh pocket at either end, which would be more useful. The inner door opens up virtually the whole side of the inner and can be clipped away tidily. The outer door has a double ended zip so the top can be opened for ventilation and there’s a buckle at the hem to relieve tension.
It’s very easy and quick to pitch. It feels pretty solid even without the TBS in place. For lowland camping it should be fine. I’m sure it would be fine in the hills as well, but like the Laser, it will probably flap a bit in high winds. Hopefully the vents at each end will help control condensation better than the old Laser, plus the door can be ventilated at the top. I suspect it will still be quite condensation prone though, which is unavoidable in these kind of tents.
One thing I was surprised about was the small pack size. It packs to about 30cms long and has a really good “burrito” style bag. It’s so much easier to pack than a stuff sack and there are two straps to compact it further. The bag is a bit heavy at 56g, but the utility more than offsets this. There’s a useful repair kit with patches and a pole sleeve (15g).
All in all it’s a really nice tent. If you don’t use trekking poles, then it’s pretty light and there aren’t many double skin tents that are lighter. Taking into account features and price, it’s a difficult tent to beat. Here I must give a special shout out to OutdoorGear in Bournemouth who answered my questions promptly and gave me a good service. My tent was delivered next day by DPD at no extra charge. I paid £225 vs a list price of £315, which is the cheapest I’ve seen the Helium.
When I first got the Air Beam frame for my Gossamer Gear Mariposa, it was fantastic. It made it so comfortable but after a couple of years, it started to slowly deflate, so I’d have to add air every hour or so. It got worse and worse until it was unusable. I couldn’t find a leak so I just put it at the back of the gear cupboard and forgot about it.
Recently a member of Trek-lite forum said they had cured the problem by using a silicone stopper. Apparently the problem was not the frame itself but the valve in the bulb that is used to inflate it. I couldn’t find a silicone stopper but a yoga ball plug looked promising (and cheap) so I ordered some from Amazon. To my amazement, it cured the problem and there was no deflation, even after leaving it inflated for a week. Next time I go out I’ll give it a proper test but I’m confident I’ll be able to use the Air Beam again. It will also work in my GG Murmur pack.
I want to thank Ultralight Outdoor Gear and Sierra Designs for their excellent customer service. As you know, I like to see how gear works, so I removed the Y frame in my Flex Capacitor rucksack. It was very difficult to put back in place. So much so, that I broke one of the connectors on the frame. It was my fault as I tried to force it back into the pocket that secures the top of the frame.
I contacted UOG to see if I could get a replacement. In short order, they contacted Sierra Designs who posted to me two new connectors. The new ones are a new design. They are solid rather than hollow, making them stronger. Maybe there have been other failures too? The pair are 3g heavier, but who cares for such a trivial increase?
Having disassembled the frame, removed the existing connector and the broken piece (with a Swiss penknife) in the other screw hole, I screwed in the new connectors and replaced the two Y arms. After reinstalling the frame, I used a spoon handle to lever the top of the frame garage over the end of the frame (both sides). It was pretty easy to do although the fit is very tight. You need to wiggle the garage around a bit to get a secure fit before engaging the Velcro tabs.
There is a video on YouTube on how to do this. However, it looks like it’s an earlier version of the pack and you have to do it slightly differently. You insert the spoon handle into the roof of the garage, then ease the top of the garage over the top of the frame. It requires a little bit of effort but is not difficult.
Anyway a big thank you to Damon at Sierra Designs and Rob at UOG for rescuing my pack. Unless you have to, it’s probably best not to remove the frame! I’m itching to use the pack but it probably won’t be until February now with the long winter nights.
Paramo is the Marmite of the outdoors and seems to attract more love and loathing than most bits of kit. Personally, I like Paramo but it’s not perfect. I treat it as a very rain resistant soft shell. On the odd occasion it can get overwhelmed by heavy rain in strong winds, but the vast majority of the time, it does its job. It’s more comfortable than a hard shell, especially in changeable conditions. They are much more breathable and most jackets have good venting options. While the jackets are excellent, I’m not keen on the trousers. They seem to be more vulnerable to leakage, especially when the material rubs together.
Like most manufacturers, over the years, they’ve changed the styles, although much less frequently than many more fashion conscious brands. Consistency, reliability and quality have been hallmarks of Paramo over the years. They were eco friendly and socially responsible before it became trendy. They’ve also been at the vanguard of repairing their products if anything gets damaged or worn. Effectively their jackets last virtually forever.
I’ve lost count of the number of Paramo jackets I’ve had. The purpose of this post is to pay homage to the great jackets they have made but are no longer in their range. In fact, I’d say the ones I’m going to mention are better than ones in their current range.
Vasco
Vasco jacket at start of 2014 TGO Challenge
The Vasco jacket is probably my favourite. I used mine on my 2014 TGO Challenge. It was so good I bought a second when they stopped making them from the Paramo eBay outlet, just in case I lost or ruined my original. I probably shouldn’t have bothered as both are still going strong and look good. I did get Paramo to repair the velcro on the chest pocket rain flaps on my first jacket (same for my 3rd Element jacket).
Why do I like the Vasco so much? Unlike some Paramo jackets it has quite a trim but not tight cut and fits me well and has enough room underneath for a thick fleece if required. The sleeve length is perfect for me coming down to the middle of the back of my hand. I love the bite tab velcro wrist adjustment which adds a bit of structure.
Ventilation is great with arm vents, a massive venting yoke over your shoulder blades and a stud flap behind the main zip which means the zip can be open but the front stays closed. Additionally the high chest pocket zips can be left open with the velcro rain flap closed for more ventilation. They are also a decent size for storage and hand warming. There’s another useful interior chest mesh pocket, large enough for a phone.
The hood is detachable with stud attachments. It’s not quite as good as the hood on the 3rd Element but does have the advantage of packing away into the collar. The fit is good and the liner means you don’t have to wear a hat underneath. Overall it’s a really great jacket. Both my jackets are mid blue with black side panels. I think the old colours are better than most of the new ones.
3rd Element
3rd Element in the Carneddau
I suspect you either love or hate this jacket. If you’ve not come across it before, it’s a little whacky. This is the second iteration, which is better than the original. You can separate the body to wear as a gilet from the hood/shoulder/arms section. In theory you could wear the top separately but I never have, hence there are three ways you can wear it.
Like the Vasco, it’s quite a trim cut, indeed, the gilet is quite snug. The arms are a little longer than the Vasco. As I mentioned before, the hood is fixed and even better. Effectively there is a double layer of material over your shoulders making it warmer and more weatherproof.
It’s also warmer as there aren’t the same venting options as the Vasco (no arm vents or yoke vent). Nevertheless it has the same stud and front zip flap arrangement as well as the option of opening the shoulder zips which attach the top section to the gilet. The chest pockets are the same as the Vasco and can also be opened to help venting.
I really like the option of turning the 3rd Element into a gilet, which gives a lot of flexibility. I find gilets are great for cooler weather, keeping your torso warm but preventing overheating as your arms can lose heat. If it gets cold, you just pop the top on. Admittedly it’s a bit fiddly to re-engage the zippers, but you’re still well protected from rain even without doing them up.
You won’t be be surprised to know I have two! My original one is red with grey side panels. The second one is green with black side panels. The reason I got the second one was it was very cheap on the Paramo eBay website and priced to go. It might even have been the last to be sold as it had been out of production for some time. Again, I like the colours more than the current pallet.
Quito
Quito on the 2017 TGO Challenge
The Quito recently went out of production, which is a shame as it’s a great jacket. It’s lighter at 500g than the Vasco (711g) or 3rd Element (756g). The main reason it is lighter is that it has a thinner outer material. While it’s not as robust, it’s still pretty durable. That said, it’s not as hard wearing as the Vasco or 3rd Element and is showing more wear and tear despite not being as old.
I was a bit sceptical about how water resistant the lighter material would be but it seems to be pretty good. Perhaps the denser weave helps. It has a totally different fit to the other two jackets. Despite being a Medium like the others, it’s a baggier fit with long sleeves. I turn the ends up most of the time. It has a simpler cuff closure too with a cloth tab and velcro, not a bite tab. I prefer the bite tab but it’s not a deal breaker.
Where the Quito scores is the massive venting zips which run from the hip all the way up the body and half way down the arm. They have a two way zip which gives massive flexibility. Behind the zips at the waist there are also two hidden hand pockets. Unfortunately they don’t have internal closures so they are better as hand warmers rather than storage. There are two internal mesh chest pockets too, but you have to open the front zip to access them. Unlike the two other jackets there’s no stud stand behind the zip, so the jacket is fully open when unzipped. This is less of an issue because of the massive venting zips.
The hood can be folded away to make a collar via a velcro tab. It’s not a brilliant arrangement but simpler and lighter than folding into a hood pocket. However, the hood is excellent when worn. Mine is a very bright red, which is much better than the original or subsequent colours. My only real criticism is that the fit is a bit baggy. I was tempted to get a Small, but didn’t like the colour options. I used my Quito on my 2017 TGO Challenge and it was great. I can’t understand why they stopped making it.
Velez Adventure Light
Velez Adventure Light on the 2015 TGO Challenge
Ok. This doesn’t quite fit the post title because they still make the Velez Adventure Light. However, mine is a slightly different version which they don’t make any more as it has the bite tab cuffs rather than simple velcro tabs (like the Quito). It has a similar lightweight outer fabric to the Quito but not exactly the same. Unlike the Quito, it has a more trim fit, which I prefer.
Unlike the others, the Velez is a smock, which is not everyone’s cup of tea but I like it. It has two large torso zips to get on and off, which also provide great venting. There’s a large chest kangaroo pocket for storage (or additional venting). The neck zip also aids getting it on and off as well as yet more venting. The sleeves are just the right length and can be rolled up for cooling.
The hood folds away into the collar which stops it flapping in the wind as well as providing some structure. Like the others the hood is excellent. It’s a really comfortable smock but slightly heavier than the Quito at 560g. It’s also very weather resistant. I wore it on my 2015 TGO Challenge. On day three the weather was awful, very wet and windy. I wore the Velez all day and didn’t get wet from either rain or sweat. I was very impressed. In some ways it’s the best of the lot. Oh and it’s an attractive red and grey too.
Summary
As you can tell, I’m a Paramo fan. That said, I often carry a lightweight hard shell just in case of torrential wind driven rain. It is such a shame that these jackets have been discontinued. I’m sure the current offerings are fine, but it seems to me, the designs are not quite as good. I also think the colour options are nowhere near as attractive. Fortunately, these jackets will last forever, so I (probably) won’t be buying any more!
Unfortunately my Lightwave Ultrahike 60 has come to the end of its life. The waterproof coating on the inside of the pack has gone all sticky and is coming off. I was tempted to get another one, but there are very few around and none my size, so I looked around for alternatives. The two that were on my radar were the Atom Packs Mo 60 and the Sierra Designs Flex Capacitor 40-60L.
While I was tempted to get the Mo 60, I already have a Mo 50. They aren’t that readily available and quite expensive, so I plumped for the Flex Capacitor, which arrived yesterday. It’s a totally different pack to the Mo. Apart from the price, I was attracted to the idea of being able to expand and contract the pack.
Fully expanded
There are plenty of other reviews elsewhere so I’ll be brief. It is very well made with no flaws that I can see. I bought the M/L with the S/M hip belt and it seems to fit me well. The hip belt is quite stiff and nicely contoured so it should be comfortable. I stuffed it with a couple of sleeping bags and it seemed to carry well, but I’ll only know when I take it out with a decent load. The shoulder padding feels a bit weird, but I’m sure it will be fine when I’m used to it.
Shock cord on top
Of course I’ve added a few tweaks. I’ve put a V of shock cord on the top do I can store a jacket or sit pad on top of the pack. I’ve made it adjustable with a cord lock. It can also be unthreaded easily if I don’t want it. It doesn’t interfere with opening the top pocket or the main body of the pack as it can be easily flipped to either side.
I didn’t like the zip pulls so I replaced those. Someone mentioned the zip pulls for the top pocket and main opening can be confused so I different colours, yellow for the top pocket and red for the two zips for the main compartment. They look more stylish than the original yellow cord ones. Mine have plastic toggles which are easier to pull. I used black ones for the hip belt pockets.
New zip pulls
I like to carry a length of thin closed cell foam mat to put under my air mattress so I used a short length of elastic attached to the internal pack back seams with safety pins to secure the foam mattress inside the pack. The photo below is not very good, but you get the idea.
Overall it seems a good pack, although very different to what I’ve been used to with no large stretch pocket on the outside, so I’ll have to get used to packing in a very different way. Weight is 1.3kg, slightly higher than the advertised 1.2kg, but not a disaster.