After about a month on postponements because of weather I finally managed to camp in the Forest last night. It’s still muddy in places, especially after the rain we had on Monday. Fortunately I found this place a few weeks back which is pretty dry. Although it’s not far from a bridle path, it is secluded and it’s unlikely anyone would wander past in the evening or early morning.
It’s a bit more open than my previous spot but has a little less road noise. However, there seemed to be a lot of planes going over. I’m not sure if the flight paths have been altered. Fortunately I had ear plugs so I had a decent sleep.
Not surprisingly, there were a few gnats about. Because of the rain it was misty in the morning first thing and there was a some condensation on the fly sheet. There were also some small slugs. Despite that, it was good to get out.
Hopefully I will be able to do a couple of trips over the next few weeks. I’m looking at an overnighter on Kinder Scout and a longer trip somewhere else, possibly Dartmoor.
Until I injured my knee in 2019, other than going out for a couple of walks a day, I didn’t do any other exercise. Natural strength and fitness carried me through my TGO Challenges and other backpacking trips. Since then I’ve come to realise that age catches up with you.
Over the past few years I’ve been doing fifteen to twenty minutes of strength and stretching exercises most mornings. It’s been a bit of trial and error to see what suits me. Most exercise regimes seem to recommend body squats for leg and knee strength. However, I’ve found chair squats even better.
Raising yourself slowly from a sitting position and then lowering yourself slowly, keeping your weight on your heels seems to be great for your quads, glutes and knees. I do forty reps every morning. I no longer get knee pains. Indeed, over the last few months, I’ve even lost the aches that I used to get in cold damp weather. It’s taken time to build up strength, but it’s such simple exercise. It seems to suit me better than full body squats.
If you want to try one exercise for walking and backpacking, you should try this. Ease yourself into it with less reps and maybe doing it every other day. Over time build it up. For me forty reps takes about four minutes.
I’m doing other body strength exercises such as glute bridges as well as using resistance bands. I think it’s worth doing some stretches and balance exercises too. However, if I only did one exercise, this would be it.
Many of you will know that I’m a fan of Tarptent tents. Henry Shires has been probably the most innovative tent designer and manufacturer over the last 20 years. If I could only have one tent, it would be the Scarp 1. Of course I didn’t stop at that, so I have the Notch Li too, which is the best double wall light tent IMO. If the Moment DW had been in a stealthier colour, I would’ve bought that instead of the F10 Helium. Of all his innovations, the pitchloc corner has been a game changer. It’s made the Scarp, Notch and Stratospire phenomenally strong tents.
Unusually, Henry has remained accessible to ordinary backpackers, often answering enquiries personally. He’s answered emails from me as well as some of my friends and even commented on this blog. In this interview there’s some interesting insights into materials as well as his design process. It looks like he may go back to using more silnylon for floors. Ultra TNT looks like an interesting material. Personally, I’d prefer it in a more muted colour, but that doesn’t look feasible. For the moment I’m sticking with my silnylon Scarp. Anyway, worth watching.
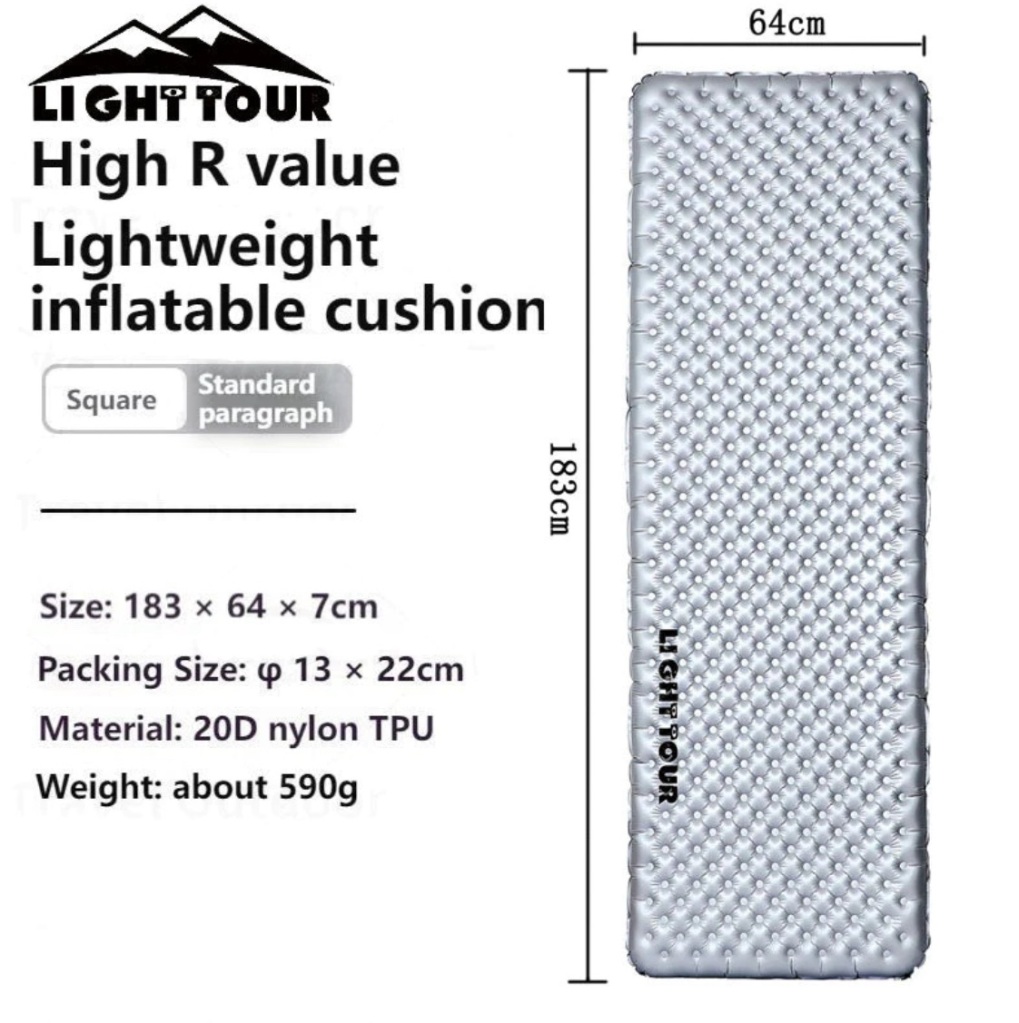
After seeing a few reviews on YouTube of the Light Tour sleeping mat (not cushion!), I decided to buy one. I wanted the larger rectangular mat as it’s wider than the mummy shape. As a side sleeper I thought it would be better to have a slightly wider mat. The cost was £114 + £4 shipping and it took eight days to arrive (tracking is provided) from China, which is pretty good over New Year. Final delivery was by Royal Mail.
For the price, it seems to be good. I won’t give it a proper test for a while. It’s slightly heavier than spec at 610g. It’s also a bit shorter than advertised at 175cm fully inflated. Width is 63cm. The length is not an issue for me as is just long enough. There is a longer length available. Inflation is easy and deflation quick, with a valve that is compatible with the Exped pump sack and Flextail pump. A decent pumpsack/ dry bag is provided.
Fully inflated it seems comfortable to lie on. In terms of warmth it feels warm, although I don’t think it’s as warm as my Nemo Tensor Alpine, which has an R value of 4.8 compared with the claimed 5.8 for the Light Tour. It’s about the same thickness but if you press it, you are more likely to feel the ground than the Tensor. When lying down fully, this isn’t an issue. I usually put a section of thin foam under my mats anyway. It’s also a bit noisier but not like a Thermarest.
Overall, for the price, it seems a good pad. Nemo does a Tensor Alpine the same size as the Light Tour but it’s double the price. If you’re looking for a winter mat, I suspect that’s a better mat. However, the Light Tour seems a good option outside of winter.
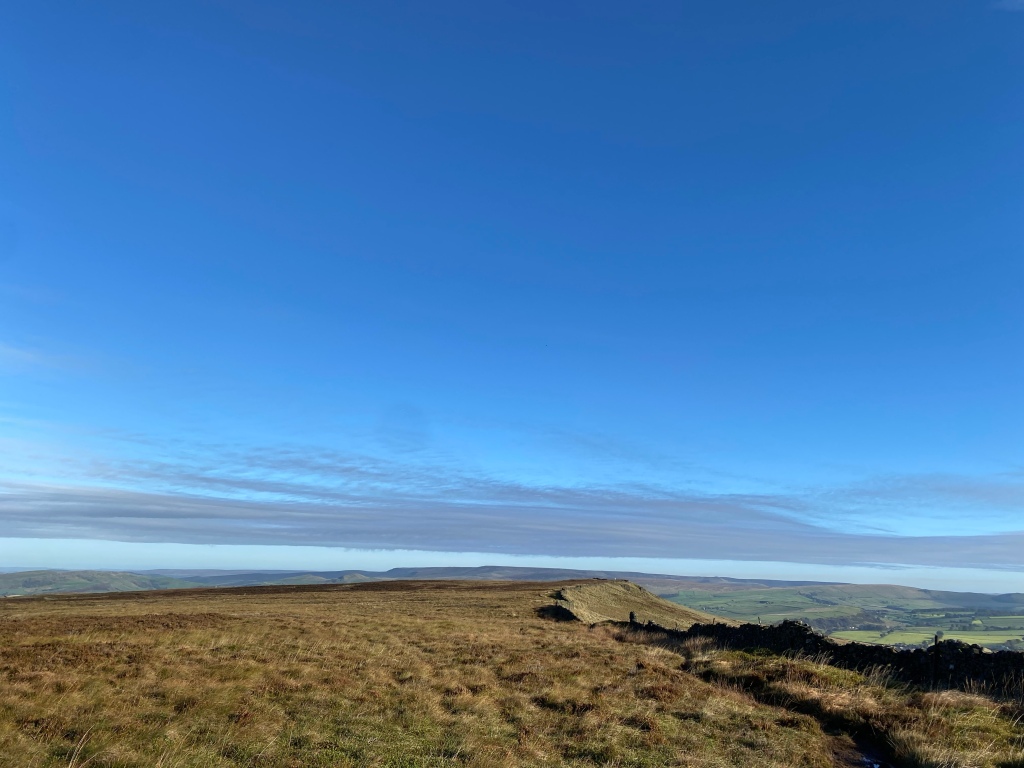
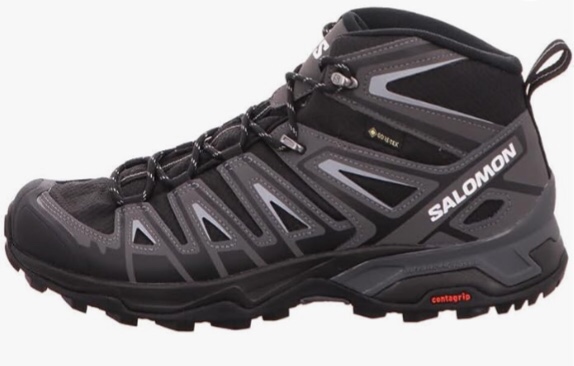
On Thursday I took the opportunity to test my new Salomon X-Ultra Pioneer mids. The previous day there had been heavy rain for most of the day so I knew it would be wet underfoot. One of my favourite places for a lonely walk near Buxton is Combs Moss. You rarely see people and although quite small, it has a wild airy feeling with good view to the north of Kinder Scout. The western edge is impressive too with its cliffs and rock falls. The paths were certainly wet and quite boggy in places.
The main purpose was to test how comfortable the Pioneers are and to see if the silicone proofing on the toes was sufficient. On the first point, they are very comfortable, virtually the same as the original X-Ultra 2.0 mids. On the second point, they didn’t let any water in but the material on the toes wetted out somewhat. My left boot was a bit damp inside which I put down to sweat condensing rather than the Goretex lining failing.
In retrospect I think it was a mistake to dilute the Silnet with white spirit (which is recommended for tent seam sealing). On my original X-Ultras I applied it neat, which seems more effective. So when I got home, I cleaned the boots, let them dry and then applied some neat Silnet. I decided I’d recoat my old X Ultras too (picture below, Pioneers on left, X Ultras on right).
Just to be safe, I coated part way up the tongue too. I’m sure that will stop the material wetting out. I suspect wetting out is a major reason why Goretex linings appear to fail on footwear that uses nylon material rather than leather. Water goes through the material when the DWR becomes ineffective and gets trapped between the outer material and the Goretex liner. This happened badly on my Inov-8 Roclite 320s. Once I did the same trick of coating the toes, the problem was solved. Make sure you cover the stitching too.
I mentioned that I was testing footbeds. I think the Sidas 3D Comfort foot beds are the best (for me). Superfeet Greens are a bit hard and the Stsvzorr ones are a bit too spongy. The Sidas are a happy medium. Strangely the Pioneers on sale in Europe are Goretex and in the US they use a Climasalomon lining. I don’t know whether Europe will follow suit. I’ve no idea what the difference is. When I found mine only Amazon and John Lewis were selling them. Now they seem to be more widely available, so it’s worth hunting around for the best price.
It’s been hard to process losing Alan. I had never really thought about this before but I think there’s a special bond when you share a backpacking trip. A lot of my backpacking has been solo, but I’ve also been fortunate to share some trips too. Looking back through my blog, I shared trips with Alan more than anyone else, either just us or in the company of others.
Walking together gives quality time to share life in a way that has largely disappeared in modern life. Backpacking is life stripped down to the essentials, excluding most of the distractions of the modernity. It’s a kind of pilgrimage and forges close bonds of friendship. Hence, losing Alan feels like a part of my life ripped away. There are wonderful memories but now they are frozen in time, never to be added to.
I’m sure many of Alan’s walking companions will feel the same as me. There are special people in life who enrich your life through their company and Alan was one of those. Alan was a deeply honest person which sometimes got him into trouble. I loved that part of his character. You felt you were always seeing the real Alan with no front or flannel.
He was always interesting and fun company. He had a great sense of humour and knowledgeable which led to interesting conversations. We went to test matches at Lord’s together a couple of times as well, where it was great to watch the cricket and have a long natter.
Andy Walker has composed a lovely tribute song to Alan on YouTube
I can’t really compete with that!
As much to remind myself as for the benefit of others, I’ve listed the trips I did, wholly or partially, with Alan below.
We also met on his 2019 TGO Challenge when I’d planned to walk with him a bit but I had hurt my knee the previous day and had to abort my walk. Then we had Covid and then Alan’s health issues.
Sadly, Alan passed away this morning, having been seriously ill for some months. I accompanied Alan on several backpacking trips and part of his 2018 TGO Challenge. Alan was TGO Challenge legend having completed 26 Challenges. He also did LEJOG in 2007. You can read about his walks on his blog. He will be sadly missed by me and many others.
…when you’re sent a letter inviting you to apply for your state pension!
Next year I will officially be a pensioner! I certainly don’t feel that old and hopefully I don’t look that old either. That said, I am more aware of the limitations of my aging body. I now follow a daily exercise regime and I’m more careful of what I eat. TBH, I wish I’d started ten to fifteen years ago but for the last four years, since I injured my knee, I’ve been more deliberate about taking care of my body. I’m no expert but I’ll do a couple of posts on exercise and diet that might help.
If I had my time over, I think starting in your fifties or even forties would be sensible, as you lose about 1-2% of your strength every year after about age forty. However, all is not lost as you can reverse the process and you don’t have to go to the gym to do it.
One of my favourite walks is from Pym Chair car park to Shining Tor via Cats Tor. You get wonderful views to the east of the Goyt Valley. To the west you can see far out over the Cheshire Plain. To the north you have the Dark Peak with the western side of Kinder Scout on the horizon.
I was going to go to Combs Moss yesterday which is another favourite place, but the Shining Tor route has a flagstone path most of the way. With the recent rain, Combs Moss would be pretty boggy in places.
Anyway, I digress. On my way up to Shining Tor from Cats Tor, I saw another walker coming towards me in the distance. At first glance he seemed to be wearing a beige shirt and trousers. Only when he got closer did I realise he was stark naked apart from a pair of leather boots!
I decided not to bother greeting him, but I hurried past. What made it even stranger was that this is a popular path and I had passed several women on the way up. Hardly the place to expose yourself, especially as he had the body shape of Mr Blobby rather than Charles Atlas!
Definitely one of the weirdest experiences I’ve had walking and hopefully one never to be repeated!
I spotted these on Amazon recently. Strangely they aren’t on the Salomon website but you can get them elsewhere, like on the John Lewis site, so they should be legit. They are currently on Amazon at £114 compared with a RRP of £155.
They are are revival of the version 2 X Ultra Mid boots. I’ve had versions 1,2 and 3 of the X Ultras and the version 2 is the best iteration IMO. The version 1 didn’t fit as well and was bit sweaty and the version 3 had a slightly different lacing system which wasn’t quite as comfortable.
I used a pair of the version 2’s on my 2017 TGO Challenge and was pleasantly surprised at how well they performed. Not only were they very comfortable but they kept my feet dry and minimally sweaty. I covered the toe area in a thin coating of Silnet which kept the water out and stopped the material from wetting out.
I think this is a major reason why fabric boots tend to fail. Either they get waterlogged and stop breathing and your feet get sweaty or the water gets trapped between the fabric and the membrane and eventually the water works its way through.
My only gripe with the X Ultras is that I’d prefer a more hard wearing and grippy sole. I wish it was Vibram. The Pioneer has low grade insoles so I’m replacing those. I’m testing the Pioneers with Superfeet, Sidas and Stsvzorr insoles (the latter from Amazon too) to see what works best.
I bought two of pairs of Pioneers so they should last me for a few years. Salomon do a version 4 of the X Ultra Mids but I was put off buying a pair as they have a weird Achilles tendon flap. Anyway, hopefully the Pioneers will keep me going for the foreseeable future.